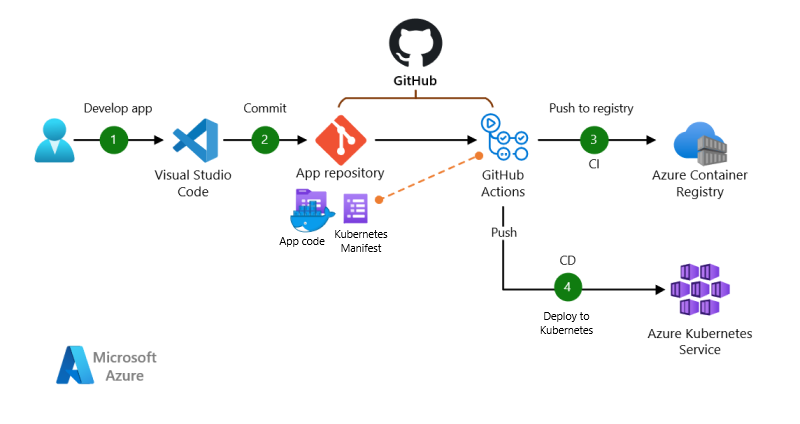
CICD - Build, test, and deploy containers to ACR/AKS using GitHub Actions
CICD - Build, test, and deploy containers to ACR, AKS using GitHub Actions
Refer to:
Build, test, and deploy containers to Azure Kubernetes Service (AKS) using GitHub Actions
Authenticate with Azure Container Registry (ACR) from Azure Kubernetes Service (AKS)
Prepare ACR and AKS
Create ACR, AKS and attach ACR to AKS with AZ CLI
1
2
3
4
5
6
7
8
9
10
11
12
13
14
15
16
17
18
MYRG=felixRG
MYACR=felixacr
MYAKS=felixaks
# create ACR
az acr create -n $MYACR -g $MYRG --sku basic
# Enable admin access of ACR, to docker login to acr
az acr update --name $MYACR --admin-enabled true
# create AKS
az aks create -n $MYAKS -g $MYRG --generate-ssh-keys --attach-acr $MYACR
# Attach using acr-name
az aks update -n $MYAKS -g $MYRG --attach-acr $MYACR
# Option: you can also Attach using acr-resource-id
az aks update -n $MYAKS -g $MYRG --attach-acr <acr-resource-id>[!NOTE]
To detach a ACR from AKS
1
2
3
4
# Detach using acr-name
az aks update -n myAKSCluster -g myResourceGroup --detach-acr <acr-name>
# Detach using acr-resource-id
az aks update -n myAKSCluster -g myResourceGroup --detach-acr <acr-resource-id>Test: working with ACR & AKS
Import an nginx image into ACR
1
az acr import -n $MYACR --source docker.io/library/nginx:latest --image nginx:v1Get AKS credentials to connect to AKS through kubectl
1
az aks get-credentials -g $MYRG -n $MYAKS[!NOTE]
Example of default AKS setup:
1
2
3
4
5
6
7
8
9
10
11
12
13
14
15
16
17
18
19
20
21
22
23
24
25
26
27
28
29
30
31
32
33
felixy@USLC-FELIXY-M ~ % az aks get-credentials -g $MYRG -n $MYAKS
Merged "felixaks" as current context in /Users/felixy/.kube/config
felixy@USLC-FELIXY-M ~ % kubectl get nodes
NAME STATUS ROLES AGE VERSION
aks-nodepool1-32082944-vmss000000 Ready agent 4h3m v1.27.7
aks-nodepool1-32082944-vmss000001 Ready agent 4h3m v1.27.7
aks-nodepool1-32082944-vmss000002 Ready agent 4h3m v1.27.7
felixy@USLC-FELIXY-M ~ % kubectl get pods -A
NAMESPACE NAME READY STATUS RESTARTS AGE
kube-system azure-ip-masq-agent-42rds 1/1 Running 0 4h4m
kube-system azure-ip-masq-agent-m8fcj 1/1 Running 0 4h4m
kube-system azure-ip-masq-agent-pzgxd 1/1 Running 0 4h4m
kube-system cloud-node-manager-hwhql 1/1 Running 0 4h4m
kube-system cloud-node-manager-pj289 1/1 Running 0 4h4m
kube-system cloud-node-manager-s6h57 1/1 Running 0 4h4m
kube-system coredns-789789675-6pkjs 1/1 Running 0 4h4m
kube-system coredns-789789675-sh56f 1/1 Running 0 4h3m
kube-system coredns-autoscaler-649b947bbd-kdthp 1/1 Running 0 4h4m
kube-system csi-azuredisk-node-79vq5 3/3 Running 0 4h4m
kube-system csi-azuredisk-node-dpvvp 3/3 Running 0 4h4m
kube-system csi-azuredisk-node-q547p 3/3 Running 0 4h4m
kube-system csi-azurefile-node-kwf2b 3/3 Running 0 4h4m
kube-system csi-azurefile-node-nqb98 3/3 Running 0 4h4m
kube-system csi-azurefile-node-wqwjn 3/3 Running 0 4h4m
kube-system konnectivity-agent-7797848fc-4bzp4 1/1 Running 0 3h9m
kube-system konnectivity-agent-7797848fc-d9wlc 1/1 Running 0 3h9m
kube-system kube-proxy-flssc 1/1 Running 0 4h4m
kube-system kube-proxy-l4g5j 1/1 Running 0 4h4m
kube-system kube-proxy-qlgvl 1/1 Running 0 4h4m
kube-system metrics-server-5467676b76-ghmfd 2/2 Running 0 4h3m
kube-system metrics-server-5467676b76-rx7p4 2/2 Running 0 4h3mCreate a deployment yaml file
nginx-deployment.yamlfor a nginx deployment and a service for load balancer for expose the nginx service to public internet1
2
3
4
5
6
7
8
9
10
11
12
13
14
15
16
17
18
19
20
21
22
23
24
25
26
27
28
29
30
31
32
33
34
35apiVersion: apps/v1
kind: Deployment
metadata:
name: nginx0-deployment
labels:
app: nginx0
spec:
replicas: 2
selector:
matchLabels:
app: nginx0
template:
metadata:
labels:
app: nginx0
spec:
containers:
- name: nginx
image: felixacr.azurecr.io/nginx:v1
ports:
- containerPort: 80
---
apiVersion: v1
kind: Service
metadata:
name: nginx0-service
spec:
type: LoadBalancer
selector:
app: nginx0
ports:
- protocol: TCP
port: 80
targetPort: 80[!CAUTION]

When you use a Kubernetes Service of type
LoadBalancerin Azure Kubernetes Service (AKS), it will automatically create an Azure Load Balancer and expose your service to the internet. This Load Balancer acts as the point of contact for external traffic to your service.Here’s what happens when you apply the provided YAML in an AKS environment:
Resource Group:
AKS often creates a separate managed resource group for resources like network resources and VMs. This is different from the resource group you specify when creating the AKS cluster. The Load Balancer might be located in this managed resource group. The name of this managed resource group usually follows the pattern
MC_<yourResourceGroup>_<yourAKSClusterName>_<region>.Azure create a VNet and subnet and NSG together with the load balancer in the resource group for a standard AKS setup
Azure Load Balancer Creation:
The
type: LoadBalancerspecification in the Service manifest instructs Kubernetes to provision an external Load Balancer in your Azure cloud environment.AKS communicates with Azure to create a Load Balancer instance.
You can identify the created LB by default:
az network lb list --query "[].{name:name, resourceGroup:resourceGroup}" -o table
Networking Setup:
- The Load Balancer is configured with a public IP address.
- It forwards incoming traffic on the specified port (in this case, port 80) to the selected pods, matching the
selectorcriteria in the Service definition.
Service Exposure:
- The service
nginx0-servicewill be exposed on the public IP address of the Azure Load Balancer. - This means the Nginx deployment becomes accessible over the internet at this public IP on port 80.
- The service
Integration with AKS:
- AKS manages the integration between the Kubernetes Service and the Azure Load Balancer, including health checks and updating the Load Balancer configuration if the underlying pods change.
[!NOTE]
When you add more services in Azure Kubernetes Service (AKS), AKS will not provision a new load balancer for each service if these services are of type
LoadBalancer. Instead, it continues to use the default Load Balancer that was initially created and adds new rules to it. This is how it typically works:- Single Load Balancer for Multiple Services:
- When you create the first service of type
LoadBalancerin AKS, a Load Balancer is provisioned in Azure. - Subsequent services of type
LoadBalancerthat you create in the same AKS cluster will use the same Load Balancer. - AKS efficiently manages this by adding new frontend configurations, backend pools, and routing rules to the existing Load Balancer for each new service.
- When you create the first service of type
- Public IP Addresses:
- Each service of type
LoadBalancerwill typically get its own public IP address. - These IP addresses are associated with the Load Balancer but are unique for each service, allowing external traffic to be directed to the correct service.
- Each service of type
Run the yaml file to deploy the niginx and load balancer service
1
2
3
4
5
6
7
8
9
# apply the yaml file
kubectl apply -f nginx-deployment.yaml
# Monitor the deployment using the kubectl get pods command
kubectl get pods -A
# It might take a few mins for loadbalancer to be provisioned and receive an extermal IP.
# Check the service status:
kubectl get svc nginx0-service[!NOTE]
output of commands:
1
2
3
4
5
6
7
felixy@USLC-FELIXY-M ~ % kubectl get pods
NAME READY STATUS RESTARTS AGE
nginx0-deployment-55ccd79fcd-j6pzj 1/1 Running 0 26s
nginx0-deployment-55ccd79fcd-kblvb 1/1 Running 0 26s
felixy@USLC-FELIXY-M ~ % kubectl get svc nginx0-service
NAME TYPE CLUSTER-IP EXTERNAL-IP PORT(S) AGE
nginx0-service LoadBalancer 10.0.23.234 4.246.240.1 80:30170/TCP 37sIdentify the created resource group and load balancer by default, and list down all the resources in the resource group
1
2
3
4
5
# Identify the resource group and load balancer
az network lb list --query "[].{name:name, resourceGroup:resourceGroup}" -o table
# List all the resources in the resource group
az resource list -g mc_felixrg_felixaks_eastus -o table[!NOTE]
output of commands:
1
2
3
4
5
6
7
8
9
10
11
12
13
14
15
16
17
18
felixy@USLC-FELIXY-M ~ % az network lb list --query "[].{name:name, resourceGroup:resourceGroup}" -o table
Name ResourceGroup
---------- --------------------------
kubernetes mc_felixrg_felixaks_eastus
felixy@USLC-FELIXY-M ~ % az resource list -g mc_felixrg_felixaks_eastus -o table
Name ResourceGroup Location Type Status
------------------------------------------- -------------------------- ---------- ------------------------------------------------ --------
aks-nodepool1-32082944-vmss MC_felixRG_felixaks_eastus eastus Microsoft.Compute/virtualMachineScaleSets
felixaks-agentpool MC_felixRG_felixaks_eastus eastus Microsoft.ManagedIdentity/userAssignedIdentities
kubernetes mc_felixrg_felixaks_eastus eastus Microsoft.Network/loadBalancers
aks-agentpool-28367344-nsg mc_felixrg_felixaks_eastus eastus Microsoft.Network/networkSecurityGroups
b0367e75-6f66-41a8-9551-69e090ccb40f MC_felixRG_felixaks_eastus eastus Microsoft.Network/publicIPAddresses
kubernetes-a8ad97b6f249341f987b1881f407c5f0 mc_felixrg_felixaks_eastus eastus Microsoft.Network/publicIPAddresses
aks-agentpool-28367344-routetable mc_felixrg_felixaks_eastus eastus Microsoft.Network/routeTables
aks-vnet-28367344 MC_felixRG_felixaks_eastus eastus Microsoft.Network/virtualNetworksRestrict the access from specific IP to Nginx service
Once you identify the newly created resource group
MC_<yourResourceGroup>_<yourAKSClusterName>_<region>and load balancer, you can go to the resource group and edit the NSG, specify the source IP address allowed to access the load balancer[!NOTE]
You may not need to manually create a VNet and subnet for a standard AKS setup, as Azure can handle this automatically. However, for custom networking needs, pre-creating these resources gives you more flexibility and control.
Custom Networking in AKS (Advanced):
- Manual Configuration: For more complex scenarios, such as integrating with existing VNets or configuring advanced networking features, you can manually create and configure your VNet and subnets.
- Custom VNet and Subnet: You can create a VNet and subnets according to your specific network requirements and then deploy the AKS cluster into this custom network.
- AKS with Custom Networking
- When creating the AKS cluster, specify your custom VNet and subnet.
- This approach is often used in enterprise environments for better control over networking, security, and compliance.
Checking Existing Network Resources:
If you’re unsure whether a VNet and subnet were automatically created for your AKS cluster, you can check:
Azure Portal:
- Go to the Azure Portal.
- Navigate to your AKS cluster resource.
- Under the “Settings” section, look for “Networking” to see the details of the network configuration.
Azure CLI:
- Use Azure CLI to list the network details of your AKS cluster.
1
az aks show --resource-group myResourceGroup --name myAKSCluster --query "networkProfile"
Finally, now you can access the nginx from internet by accessing the external IP as below
1
2
3
felixy@USLC-FELIXY-M ~ % kubectl get svc nginx0-service
NAME TYPE CLUSTER-IP EXTERNAL-IP PORT(S) AGE
nginx0-service LoadBalancer 10.0.23.234 4.246.240.1 80:30170/TCP 150m
Remove all the infra resources of AKS and ACR
1
2
3
felixy@USLC-FELIXY-M ~ % az aks delete -n $MYAKS -g $MYRG --yes --no-wait
felixy@USLC-FELIXY-M ~ % az acr delete -n $MYACR --yes[!NOTE]
This command will remove the AKS provisioned in your designated resource group, as well as the resource group AKS provisioned and all associated resources such as load balancer, vnet, subnet, nsg, public ip address, etc…
Create the CICD pipeline
Prepare the github actions workflow
In the GitHub repo, create a new file in the
.github/workflowsdirectory, e.g.,ussrelab-ci-cd.yml.Define the Workflow:
- The workflow file should define jobs to:
- Build and push the Flask application image to ACR.
- Optionally, build and push custom MySQL and Elasticsearch images if you have specific customizations. Otherwise, you can use the official images directly in your Kubernetes deployment.
- Deploy these images to AKS.
- The workflow file should define jobs to:
Example workflow yml file:
ussrelab-ci-cd.yml1
2
3
4
5
6
7
8
9
10
11
12
13
14
15
16
17
18
19
20
21
22
23
24
25
26
27
28
29
30
31
32
33
34
35
36
37
38
39
40
41name: USSRELab CI/CD Pipeline
on:
push:
branches: [ flask2024 ]
paths:
- 'app'
- '.github/workflows/ussrelab-ci-cd.yml'
jobs:
build-and-deploy:
runs-on: ubuntu-latest
steps:
- uses: actions/checkout@v4
- name: Log in to Azure Container Registry
uses: azure/docker-login@v1
with:
login-server: ${{ secrets.acr_name }}.azurecr.io
username: ${{ secrets.ACR_USERNAME }}
password: ${{ secrets.ACR_PASSWORD }}
- name: Build and push Docker image for Flask App
run: |
docker build -t ${{ secrets.acr_name }}.azurecr.io/microblog:latest .
docker push ${{ secrets.acr_name }}.azurecr.io/microblog:latest
- name: Azure login
id: login
uses: azure/login@v1.4.3
with:
creds: ${{ secrets.AZURE_CREDENTIALS }}
- name: Connect to Azure Kubernetes Service
run: |
az aks get-credentials --resource-group ${{ secrets.resource_group }} --name ${{ secrets.cluster_name }}
- name: Deploy Flask App to AKS
run: |
kubectl apply -f k8s-deployment/flask-deployment.yaml[!NOTE]
Replace
<acr-name>,<myResourceGroup>, and<myAKSCluster>with your actual Azure Container Registry name, AKS resource group name, and AKS cluster name. Make sure to storeACR_USERNAMEandACR_PASSWORDas secrets in your GitHub repository settings.Set up required secrests in Github
Store your Azure service principal credentials, ACR credentials, and any other required secrets in GitHub Secrets for use in your workflow.
Example practice is to define it in Github responsitory and call the variables from github actions workflow
Create a service principal to access your resource group with the
Contributorrole using theaz ad sp create-for-rbaccommand. Replace<SUBSCRIPTION_ID>with the subscription ID of your Azure account and<RESOURCE_GROUP>with the name of the resource group containing your ACR.1
2
3
4
5az ad sp create-for-rbac \
--name "ghActionAzureSREapp" \
--scope /subscriptions/<SUBSCRIPTION_ID>/resourceGroups/felixRG \
--role Contributor \
--json-authYour output should look similar to the following example output:
1
2
3
4
5
6
7{
"clientId": <clientId>,
"clientSecret": <clientSecret>,
"subscriptionId": <subscriptionId>,
"tenantId": <tenantId>,
...
}[!NOTE]
If you want to check the created SP and delete it, can use below commands
1
2
3az ad sp list --all --query "[?displayName=='ghActionAzureSREapp'].{name:displayName, appId:appId}"
az ad sp delete --id 6e7fb2db-f767-401e-9ef4-ac3d80c9b66e[!NOTE]
If you want to get the clientId (appId) and secret, can use below commands
1
2
3
4az ad sp list --filter "displayName eq 'ghActionAzureSREapp'" --query "[].appId" -o tsv
# This command will output a new password, which will be your new clientSecret
az ad sp credential reset --id <YourServicePrincipalId>Get the “subscriptionId”, “tenantId”
1
az account show --query "{subscriptionId: id, tenantId: tenantId}"[!WARNING]
As my orgnization policy only allow credential lifetime within 90 days, however az cli can only specifiy the parameter
--year, the default lifetime is 1 year.So the alternative is to create the principal credentials through powershell commands as below
1
2
3
4
5
6
7
8
9
10
11
12
13
14
15
16
17# install powershell az module
PS /Users/felixy> Install-Module -Name Az -AllowClobber -Scope CurrentUser
# confirm the installation
PS /Users/felixy> Get-Command -Module Az.*
# connect to azure
PS /Users/felixy> Connect-AzAccount
# create the service principle credential for 1 month
PS /Users/felixy> $endDate = (Get-Date).AddMonths(1)
PS /Users/felixy> $endDate = (Get-Date).AddMonths(1) PS /Users/felixy> New-AzADServicePrincipal -DisplayName "ghActionAzureSREapp" -Role "Contributor" -Scope "/subscriptions/6b892183-b95d-42e5-b659-fa2bef8f11f7/resourceGroups/felixRG" -EndDate $endDate
DisplayName Id AppId
----------- -- -----
ghActionAzureSREapp 15af80d8-fd8e-4038-a91d-2a5061d09519 545c5bc0-d4f8-49c6-8578-6a5770f40a1f[!CAUTION]
In Azure Active Directory (Azure AD), the concepts of “App Registrations” and “Enterprise Applications” are closely related but serve different purposes, and this can sometimes lead to confusion, especially when it comes to locating service principals.
App Registrations
- Definition: In Azure AD, an “App Registration” represents the definition of an application within your directory. It’s where you define your application’s identity configuration, such as its name, URLs, permissions, and other settings.
- Service Principals: When you register an application in Azure AD (through Azure Portal or Azure CLI), a service principal is automatically created in your Azure AD tenant. This service principal is essentially an instance of the application that has permissions to access resources and perform tasks in a specific Azure AD tenant.
- Azure CLI and App Registrations: When you create a service principal using Azure CLI (
az ad sp create-for-rbac), what you’re actually doing is registering an application and then creating a service principal for that application. You can find this registration under “App Registrations” in the Azure Portal.
Enterprise Applications
- Definition: “Enterprise Applications” in Azure AD are essentially instances of applications within your directory. They represent applications that are being used by your organization, including both applications you’ve developed (and registered in your directory) and third-party applications.
- Service Principal Visibility: Every application in “Enterprise Applications” is represented by a service principal in your directory. However, not every service principal (especially those created manually or through Azure CLI) will be immediately visible under “Enterprise Applications”. This section is typically used to manage access to external and internal applications and their configurations (like single sign-on).
Why Your Service Principal Might Not Be Visible in Enterprise Applications
- Filtering and Configuration: The “Enterprise Applications” list can be filtered and may not show all service principals by default. Additionally, certain configurations or types of service principals might not appear here.
- Synchronization Delay: Sometimes, there can be a delay in the synchronization between the creation of a service principal and its appearance in the “Enterprise Applications” section.
- Manual Creation via Azure CLI: Service principals created manually through Azure CLI, especially for automation or backend services, are often managed directly under “App Registrations” and might not appear in “Enterprise Applications” unless they’re configured for use by users or groups within the organization.
To find a service principal you created via Azure CLI, it’s usually best to look under “App Registrations” in the Azure Portal. If you need it to appear under “Enterprise Applications” for specific management purposes, you may need to configure it further, depending on your requirements.
Navigate to your GitHub repository settings and select Security > Secrets and variables > Actions.
For each secret, select New Repository Secret and enter the name and value of the secret.
Secret name Secret value AZURE_CREDENTIALS The entire JSON output from the az ad sp create-for-rbaccommand.service_principal The value of <clientId>.service_principal_password The value of <clientSecret>.subscription The value of <subscriptionId>.tenant The value of <tenantId>.registry The name of your registry. repository azuredocs resource_group The name of your resource group. cluster_name The name of your cluster. act_name The name of your acr, the same of registry ACR_USERNAME The value of name of your registry ACR_PASSWORD The value of registry access key:
az acr credential show --name <acrName>you can compose your own
AZURE_CREDENTIALSJSONCreate a JSON string with the required fields. It should look like this:
1
2
3
4
5
6{
"clientId": "<YourClientId>",
"clientSecret": "<YourClientSecret>",
"subscriptionId": "<YourSubscriptionId>",
"tenantId": "<YourTenantId>"
}Replace
<YourClientId>,<YourClientSecret>,<YourSubscriptionId>, and<YourTenantId>with the actual values.
Prepare the deployment and service manifest yaml files for flask application, MYSQL and Elasticsearch
Create Kubernetes Deployment and service Manifests for Flask app:
flask-deployment.yaml1
2
3
4
5
6
7
8
9
10
11
12
13
14
15
16
17
18
19
20
21
22
23
24
25
26
27
28
29
30
31
32
33
34
35
36
37apiVersion: apps/v1
kind: Deployment
metadata:
name: flask-app
spec:
replicas: 2
selector:
matchLabels:
app: flask-app
template:
metadata:
labels:
app: flask-app
spec:
containers:
- name: flask-app
image: <acr-name>.azurecr.io/microblog:latest
ports:
- containerPort: 5000
env:
- name: SECRET_KEY
value: "my-secret-key"
- name: DATABASE_URL
value: "mysql+pymysql://microblog:novirus@mysql/microblog"
---
apiVersion: v1
kind: Service
metadata:
name: flask-service
spec:
type: LoadBalancer
ports:
- port: 80
targetPort: 5000
selector:
app: flask-app[!NOTE]
Noted that the type of service is loadbalancer, which AKS will ask Azure to create the loadbalancer for internet users to access
Create MYSQL Deployment and service Manifests for mysql:
mysql-deployment.yaml1
2
3
4
5
6
7
8
9
10
11
12
13
14
15
16
17
18
19
20
21
22
23
24
25
26
27
28
29
30
31
32
33
34
35
36
37
38
39
40
41
42
43---
# MySQL Deployment
apiVersion: apps/v1
kind: Deployment
metadata:
name: mysql
spec:
replicas: 1
selector:
matchLabels:
app: mysql
template:
metadata:
labels:
app: mysql
spec:
containers:
- name: mysql
image: mysql:latest
env:
- name: MYSQL_ROOT_PASSWORD
value: "yes"
- name: MYSQL_DATABASE
value: "microblog"
- name: MYSQL_USER
value: "microblog"
- name: MYSQL_PASSWORD
value: "novirus"
ports:
- containerPort: 3306
---
# MySQL Service
apiVersion: v1
kind: Service
metadata:
name: mysql
spec:
type: ClusterIP
ports:
- port: 3306
selector:
app: mysqlCreate Elasticsearch Deployment and service Manifests for elasticsearch:
elasticsearch-deployment.yaml1
2
3
4
5
6
7
8
9
10
11
12
13
14
15
16
17
18
19
20
21
22
23
24
25
26
27
28
29
30
31
32
33
34
35
36
37
38
39---
# Elasticsearch Deployment
apiVersion: apps/v1
kind: Deployment
metadata:
name: elasticsearch
spec:
replicas: 1
selector:
matchLabels:
app: elasticsearch
template:
metadata:
labels:
app: elasticsearch
spec:
containers:
- name: elasticsearch
image: docker.elastic.co/elasticsearch/elasticsearch:8.11.1
env:
- name: discovery.type
value: "single-node"
- name: xpack.security.enabled
value: "false"
ports:
- containerPort: 9200
---
# Elasticsearch Service
apiVersion: v1
kind: Service
metadata:
name: elasticsearch
spec:
type: ClusterIP
ports:
- port: 9200
selector:
app: elasticsearch
Initiate and setup the MYSQL and Elasticsearch on AKS firstly
Apply the mysql and elasticsearch manifests, as these services are not necessary to be included in GitHub actions workflow
1 | |
Test and Verify the CICD pipline
Update the application and commit/push the code to GitHub to trigger CICD

Check the extern-ip as below and access the web application
1 | |
